Category Archives: Home

Monthly Cleaning, Month #3

Two months of cleaning down! How’s it been going? I’ve cleaned the office and the living room and now the room for October is the guest room!

The living room cleaning went well. I don’t think I met my goal of getting rid of 10 things, but it’s so hard to find books and DVDs to get rid of! We did throw away A LOT of magazines, so maybe that counts?…. My favorite part of cleaning the living room is conditioning our leather couches. I think you’re supposed to do that every few months, but we’ve only succeeded in once a year. But it’s so fun. They look and smell like new!

I’m dreading the guest room a little bit… It’s our “storage room” and I really want to do a good job cleaning it out. It will be our baby room, whenever that happens, and I want to get a jump on getting it cleaned out. But so much of what we have in there is sentimental. My husband and I are both “sentimental hoarders”. We cannot get rid of something if it has even a little bit of emotional value. That’s a problem. Does anyone else struggle with this??

Guest Room Checklist

1 Comment

Filed under Home

The Follow-Up to 30

Last  year my hubby turned 30 and I celebrated big, throwing him a party and giving him 30 gifts. So as his 31st birthday has approached this year, I’ve struggled with how to follow up on all the hype of last year. Really, there’s no way, so I settled on a “normal” birthday of dinner out, cake, and a “normal” number of presents. I think my favorite present to him was the one Oliver gave him- a package of deli sliced chicken meat. They both LOVE it but I don’t buy it much because I prefer turkey. So Oliver bought him a package for them to share. Adorable.

2014-08-14 (11) michael's 31st birthday

2014-08-14 (32) michael's 31st birthday

Michael requested a lemon cake. Yuck. Delicious. A few years ago I was given the book The Cake Mix Doctor Returns by Anne Byrn but haven’t gotten to use it as much as I want because Weight Watchers. So I turned to it to search for a good lemon cake recipe. If you don’t know about the Cake Mix Doctor, she doctors up box mixes to make even better cakes. I decided to use the recipe for her Lemon Lover’s Cake (Though, slightly altered because the grocery store was out of lemons. Of course.) (Also, this was definitely not my best decorating effort. It was SO. HOT. in the kitchen and the icing wasn’t cooperating and it just didn’t go well. Please excuse the decorating disaster this one time).

2014-08-14 (14) michael's 31st birthday

Lemon Lover’s Cake (from Anne Byrn’s The Cake Mix Doctor Returns, page 53)

Cake Ingredients:

  • 1 box (18.25 oz, though, that doesn’t exist anymore, so….) plain yellow or vanilla cake mix (I used yellow but I think next time I would just use white. The yellow taste came through kind of strong)
  • 1 package (3.4 oz) lemon instant pudding mix
  • 1 container (6 oz) lemon yogurt
  • 3/4 cup water
  • 1/2 cup vegetable oil
  • 4 large eggs
  • 1 Tbsp lemon juce
  1. Preheat the oven to 350 degrees.  Spray and flour the pans (I used 9 inch squares, but the recipe calls for round).
  2. Mix all the ingredients together on low for 30 seconds, then 1 and a half minutes longer on medium, scraping the sides of the bowl periodically. Pour the batter evenly into the two pans.
  3. Bake until golden brown, 25-30 minutes. (I baked mine 22 minutes since they were square and they were almost overbaked)
  4. Let cool completely before icing.

In the book, Byrn includes a recipe for lemon cream cheese frosting, but I’ve never had much luck making my own frostings so I bought a can of cream cheese icing and a can of lemon, added a bit of lemon juice and mixed it all together in the mixer. It turned out great!

I think the 31st birthday went well!

Leave a comment

Filed under Home, Hound

Monthly Cleaning Fun!

monthly cleaning

A year ago I wrote a post entitled “Cleaning Up and Cleaning Out”. It was about starting a deep cleaning/full house clean out system of focusing on one room each month. I said I was going to follow-up each month, and I didn’t. BUT, I did make it the entire year which felt AMAZING. And now since it’s August, the year starts over! I envision this year being a lot easier since things are already pretty cleaned out and I have a list and know what works and what doesn’t.

This is the plan I followed for last year, and will follow again this year. I chose certain rooms/areas based on how busy a certain month would be and the weather. Obviously, we have a small house and many of you have more rooms, or different rooms, but to give you an idea, here’s the plan I follow:

  • August: Office/Craft room
  • September: Living Room
  • October: Guest Room
  • November: Entry, Guest Bath (November is a busy month for us with our anniversary and Thanksgiving, so I chose small rooms!)
  • December: Laundry Room (Again, busy month!)
  • January: Master Bedroom
  • February: Master Bathroom
  • March: Garage, Cars (The weather is nice for these!)
  • April: Patio, Landscape, House Exterior (Nice weather and plants/landscaping stuff for sale!)
  • May: Kitchen
  • June: Emergency Preparedness

This system worked SO WELL. At this point I am unemployed and have no kids, so I know my life isn’t as crazy as most and I know that as things change it may become more difficult to accomplish. But I think it’s such a great goal and makes you feel really good at the end of each month, and year!

So, for August the room is the Office/Craft Room (also where Oliver hangs out all day). I’ve made a PDF of the Office Checklist I use, but again, we all have different furniture, etc. so it may not all apply to you, but it’s a start to get you thinking about what your needs are! (Feel free to ask about any of the items that you’re unclear on!) Last year we rented a carpet steamer and did all the carpeted areas at once for the year. Again, the goal is to deep clean AND clean out/organize. I’m trying to set a goal for myself to get rid of at least 10 things per room, we’ll see how that goes!….

Let me know if you get on board with this system and how it works for you! I’ll update in September with the checklist for the living room.

4 Comments

Filed under Home

40th Anniversaries

In December 2012 we celebrated my in-law’s 40th Wedding Anniversary, and this past May we celebrated my parents. Even before getting married, I felt that marriage was something to be celebrated. In these days, marriages have become so short-term, the commitment so fake and selfish, that staying together for 40 years needs to be celebrated!

anniv

For my in-laws, we planned a party. They aren’t really “party people”, but we didn’t give them much choice in the matter. Most of their family and friends all live in the same area as us, so it was easy to gather everyone. Every single person we invited came. Wow. That is amazing for a party! And it was so wonderful. Felt very much like a big family reunion with both sides of the family there and great family friends. So much love and celebration for this huge milestone.

I designed the invitation and then had them printed at Staples

I designed the invitation and then had them printed at Staples. Obviously I’ve redacted some address and phone number info!

The hardest aspect was that we are only children. Meaning, Michael and I had to plan and pay for everything by ourselves. Oh how I was wishing for siblings!! With that cost barrier, it wasn’t as “fancy” as it could have been, but we aren’t fancy people so it worked out. We rented a low-cost “hall”, made all the food, and bought basic decorations. The one thing we splurged on was the cake and I am SO GLAD we did. It was perfect.

DSC01695

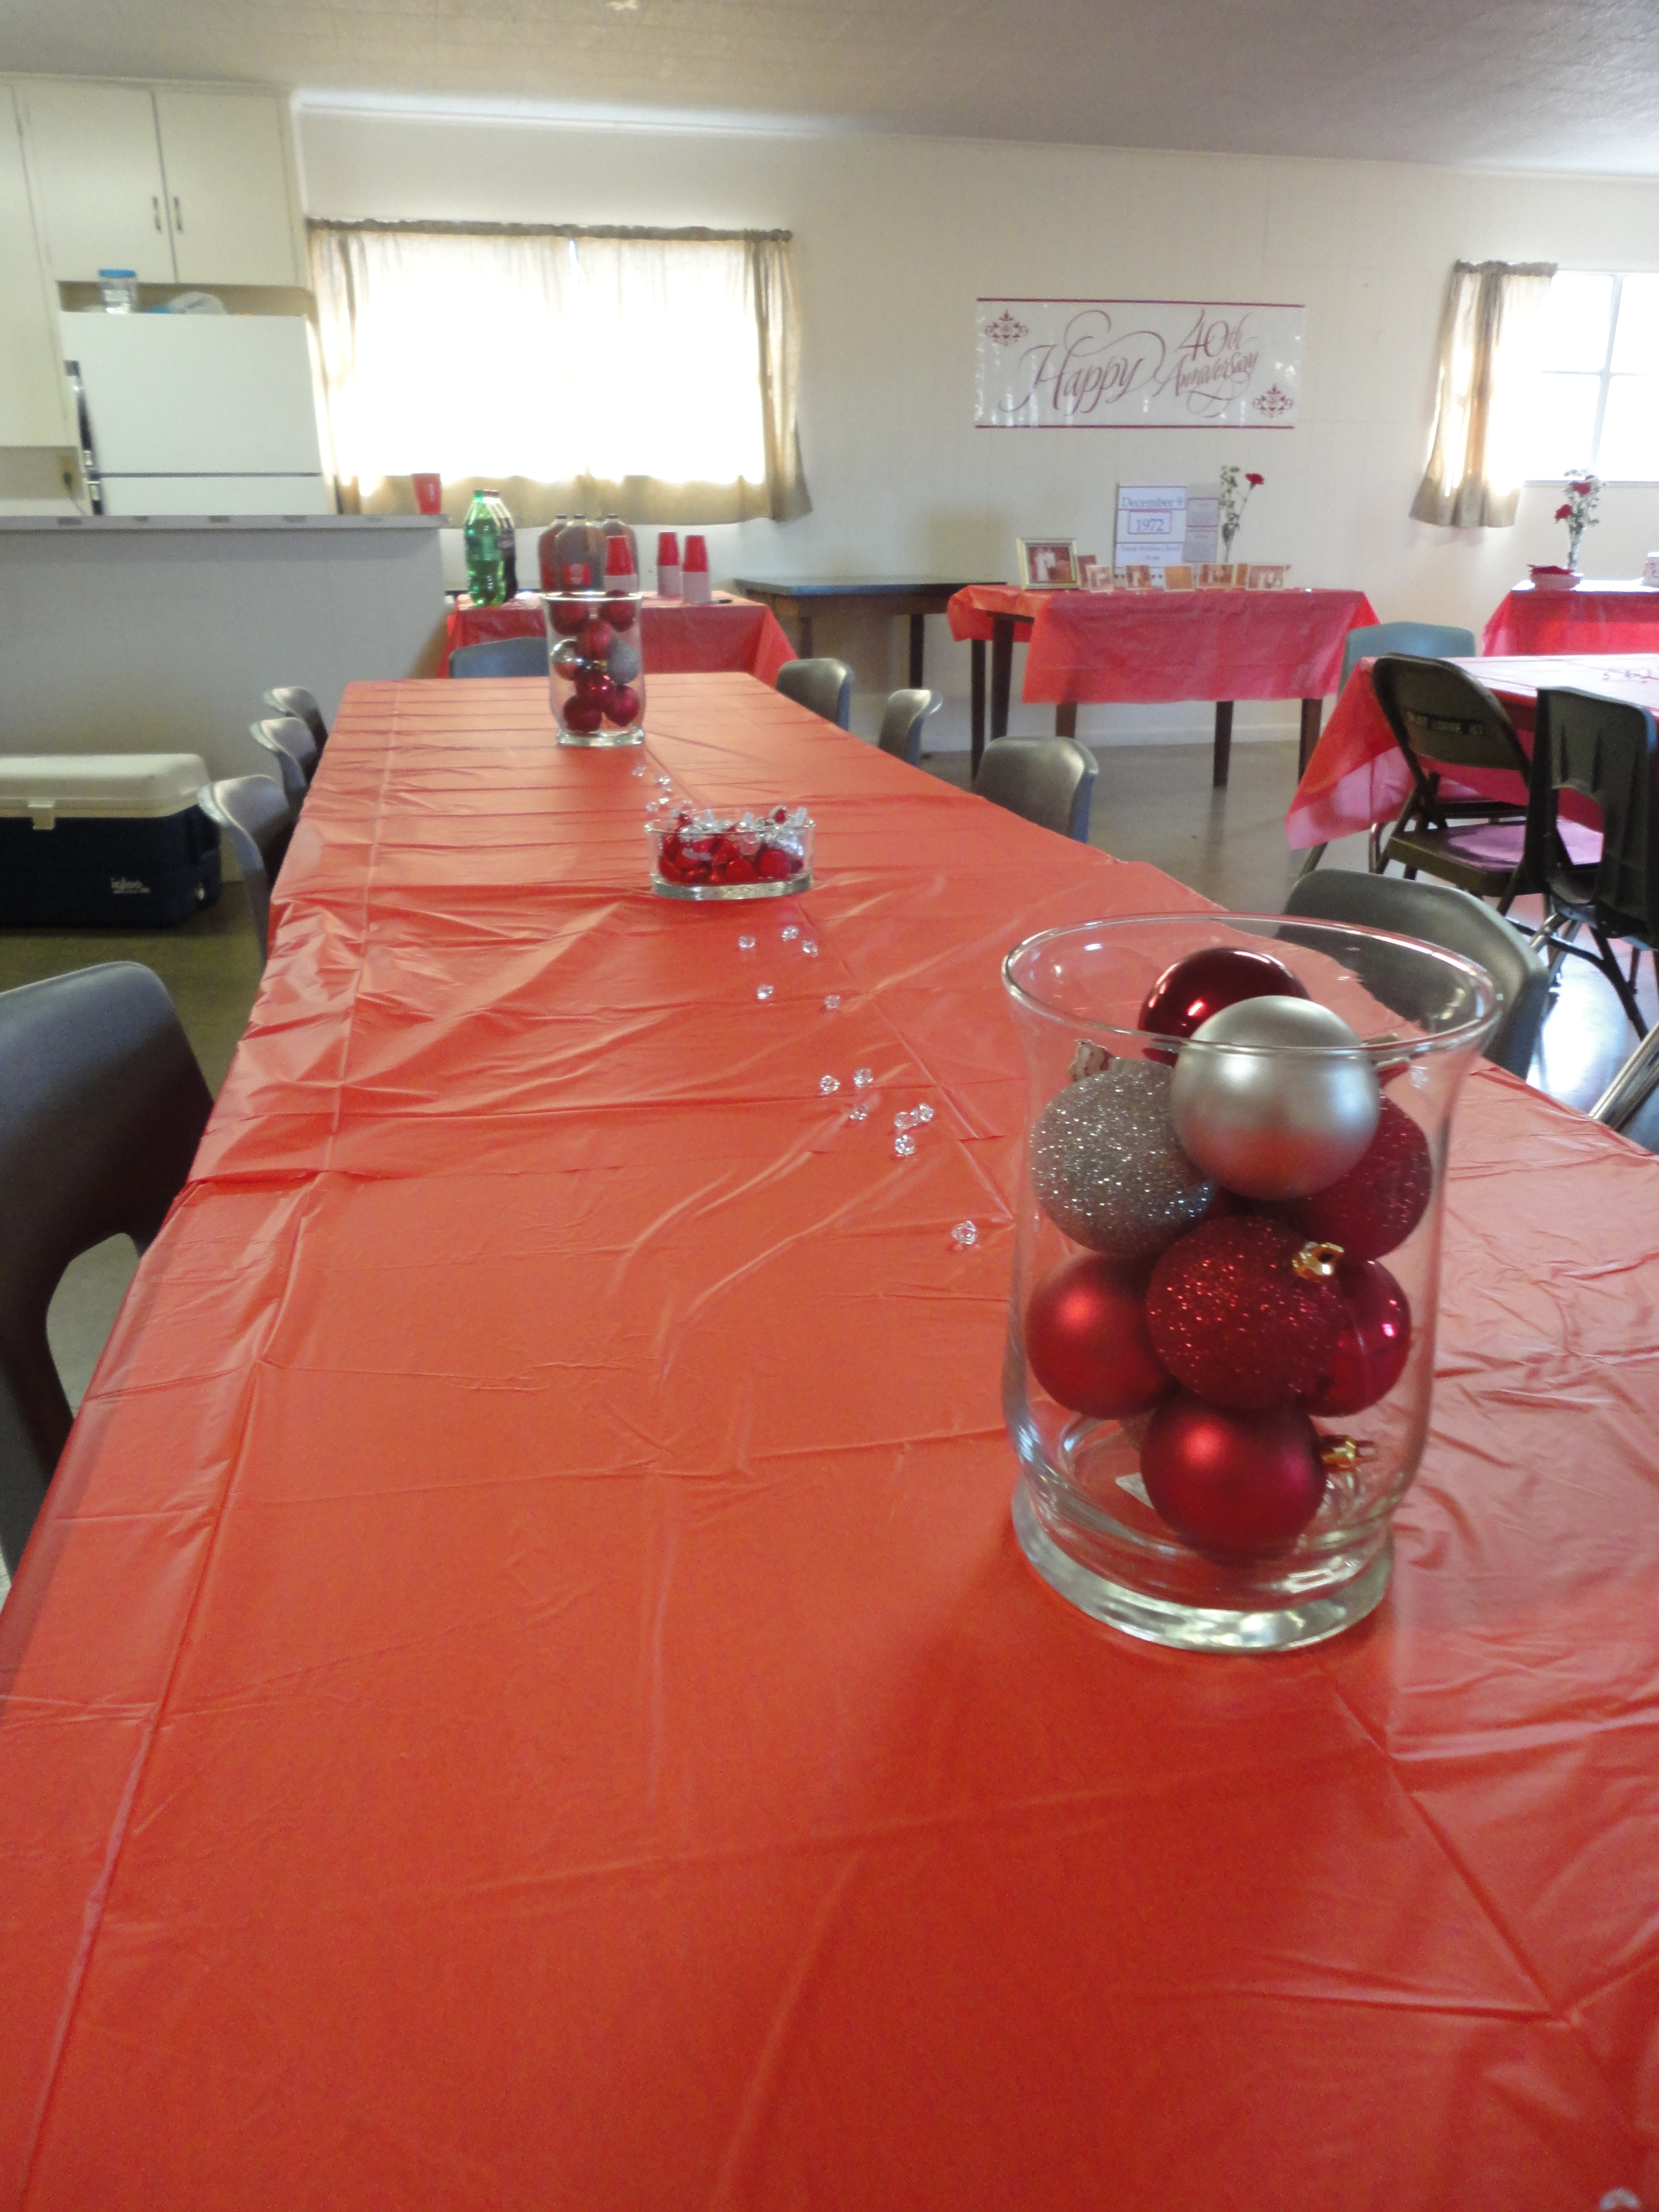
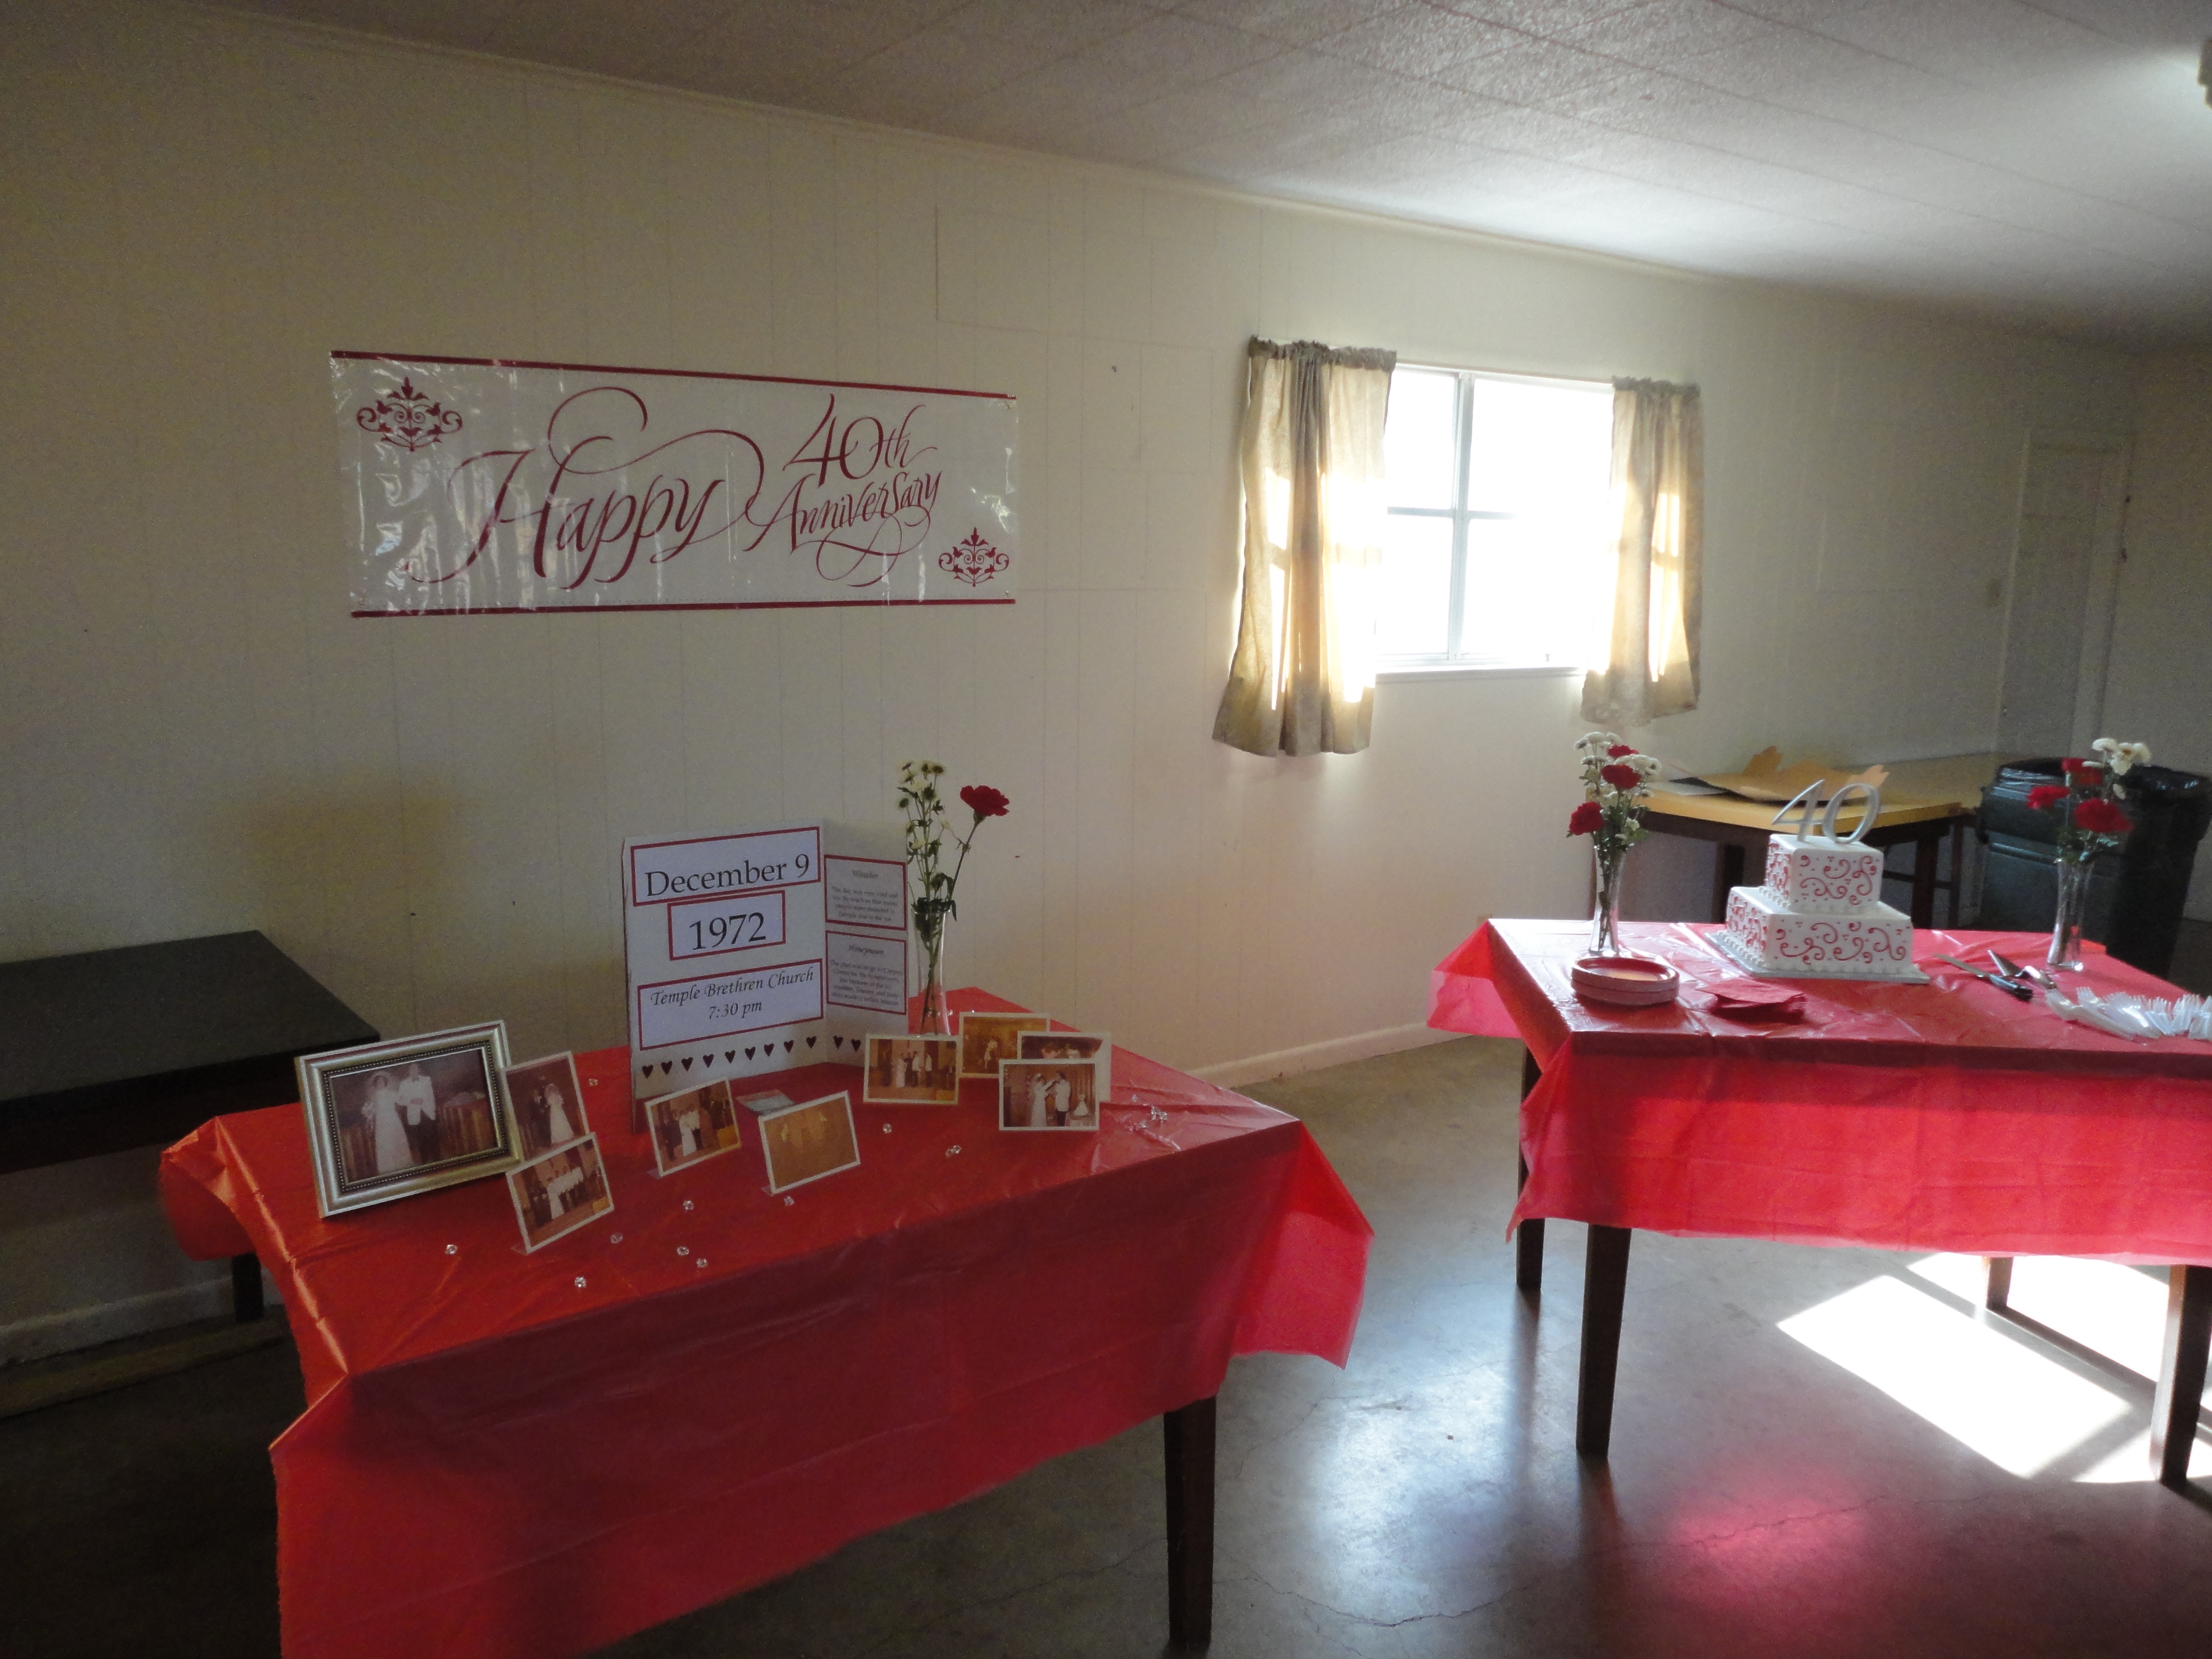
Since the 40th Anniversary is traditionally the “Ruby” anniversary, we went with a red theme. It sure helped that it was around Christmas time!

DSC01693

For table decor, we used cheap plastic tablecloths with silver and red ornaments in vases. We used the same decor style at our wedding (except the colors were teal and blue). We also had heart shaped candy dishes on the tables with silver and red wrapped Hershey kisses and Andes mints. And some fake jewels strewn down the center (I think those were leftover from our wedding too).

DSC01685

At the entrance, I placed some 40th anniversary pictures we had taken, some candy, and pens and papers to write a note to Tommy and Judy. I wish I had a better picture of the note papers, but they were just 4×6 notecards that I stamped hearts onto. I later put them into a photo album with pictures from the party that we gave the in-laws for Christmas.

DSC01697
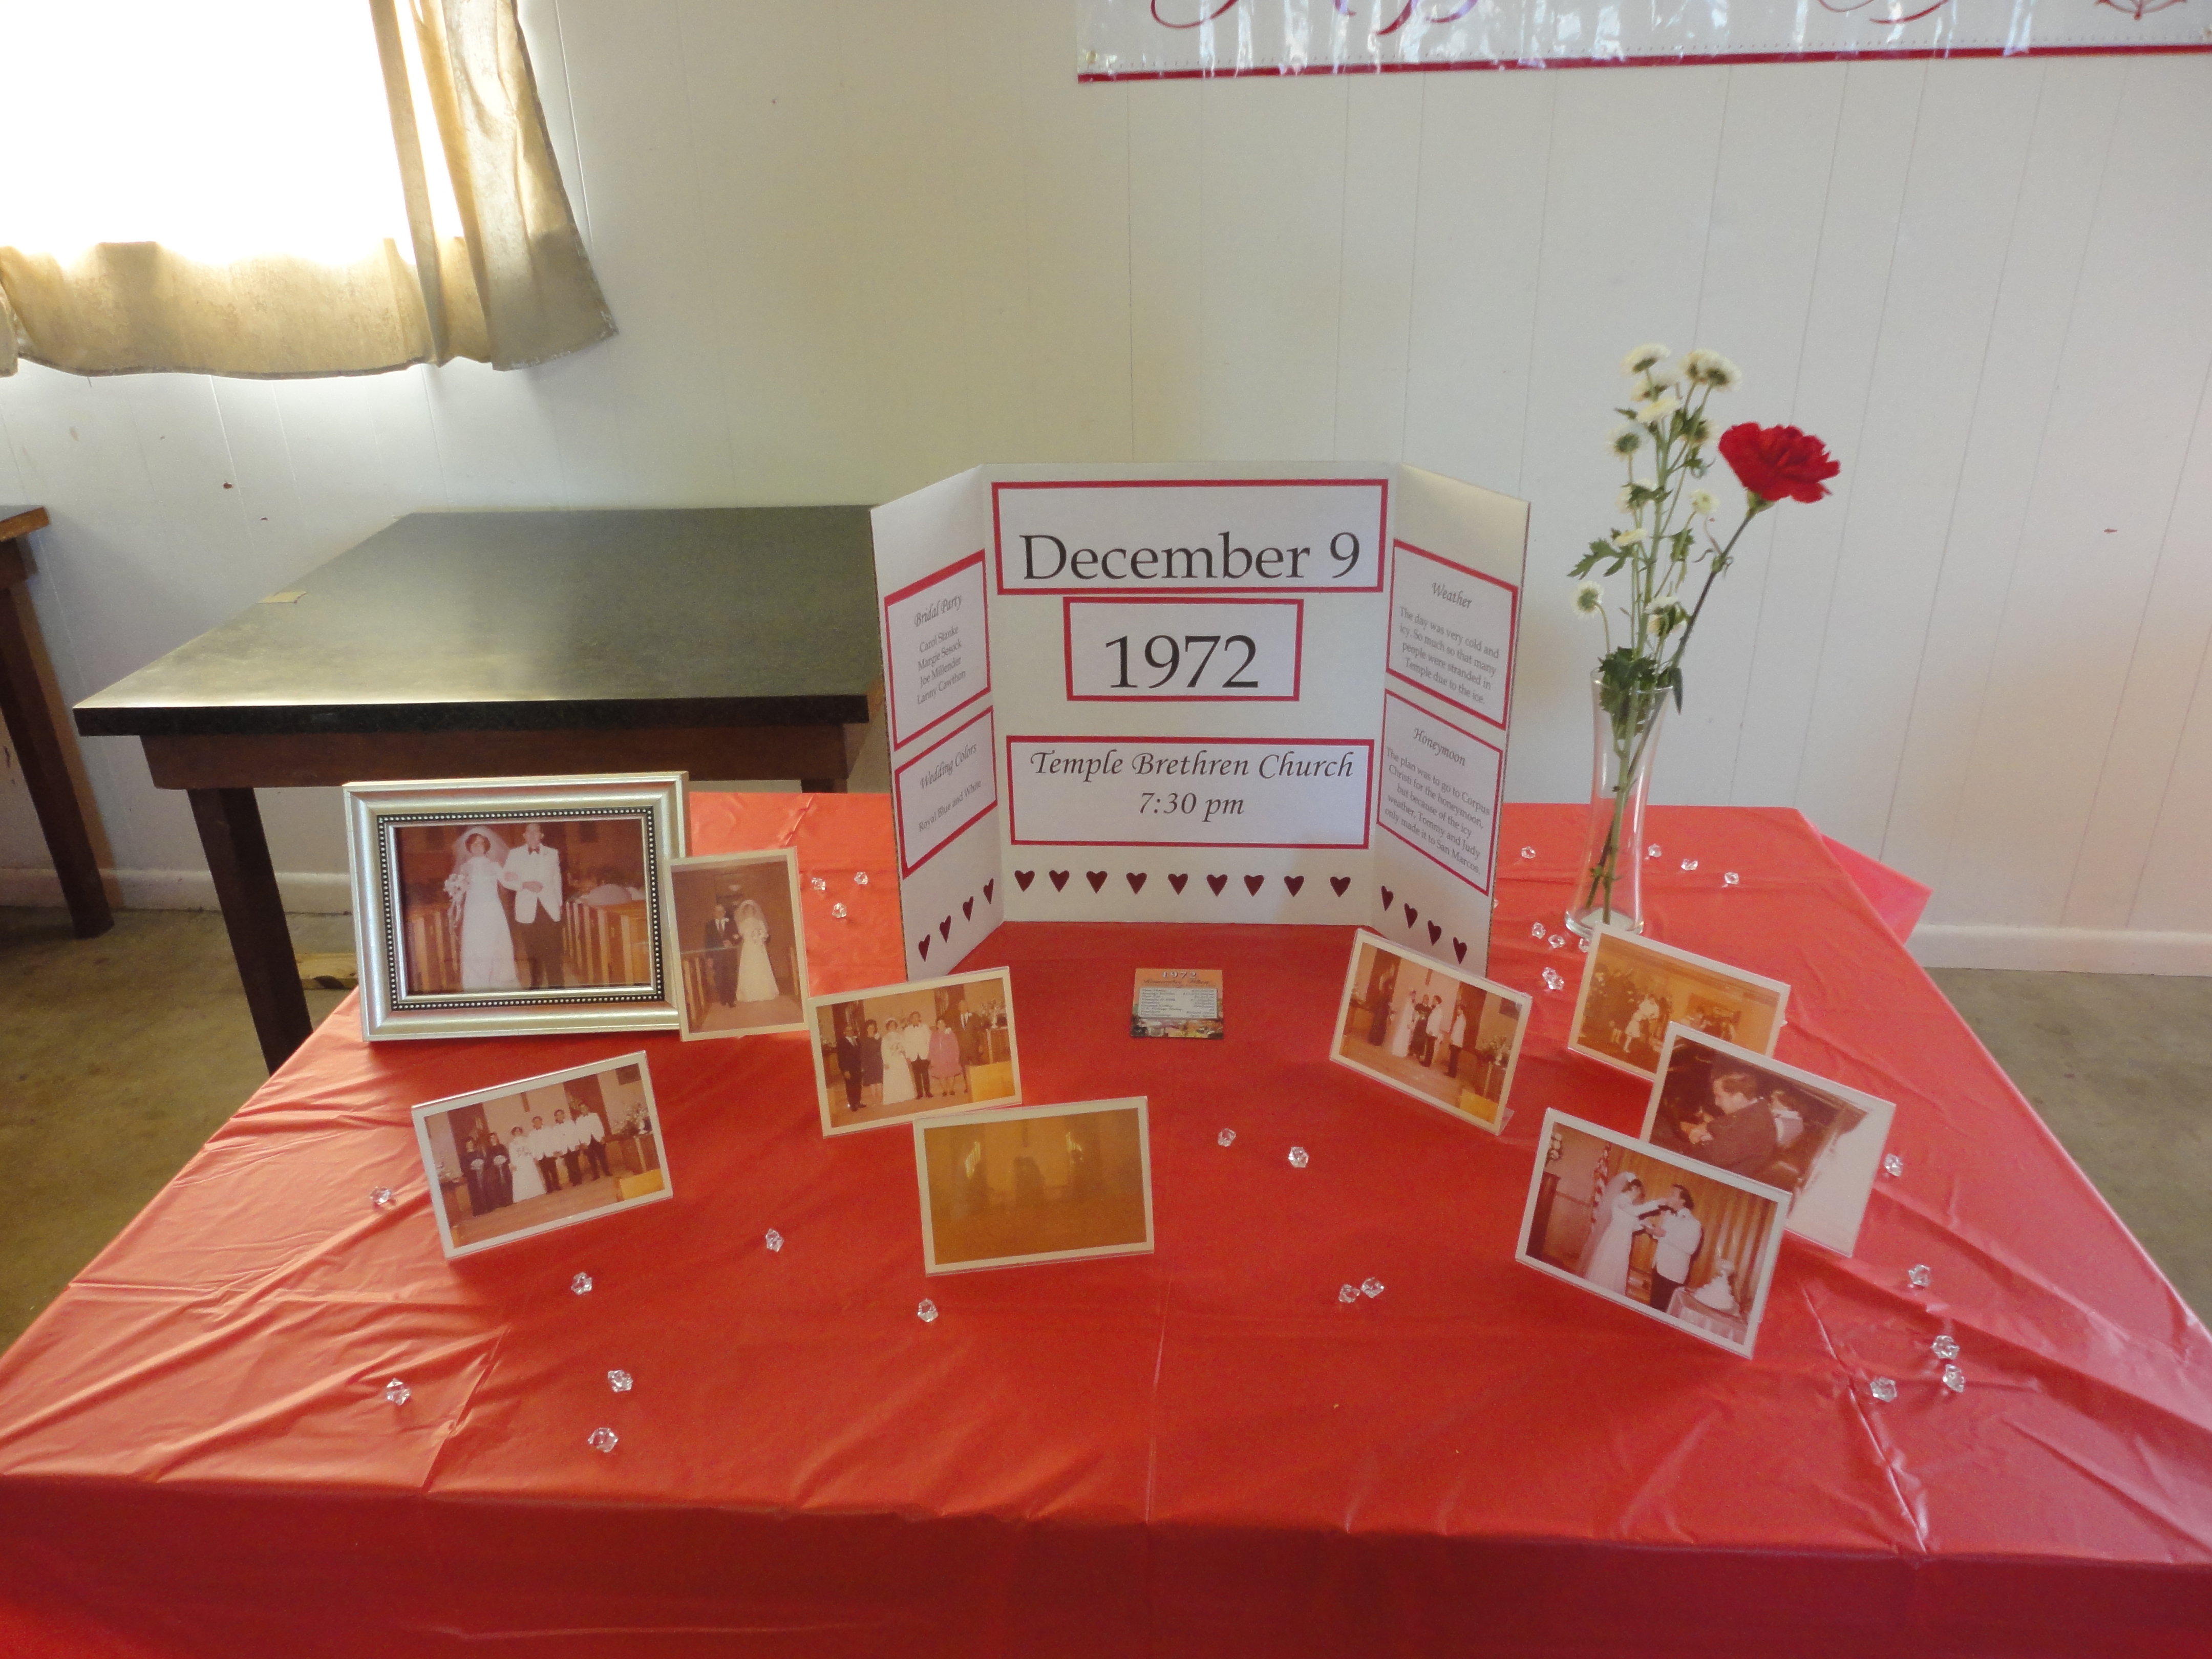
I set up a table with pictures from their wedding and a board with facts about their wedding: date, time, wedding party, reception, honeymoon.

DSC01699

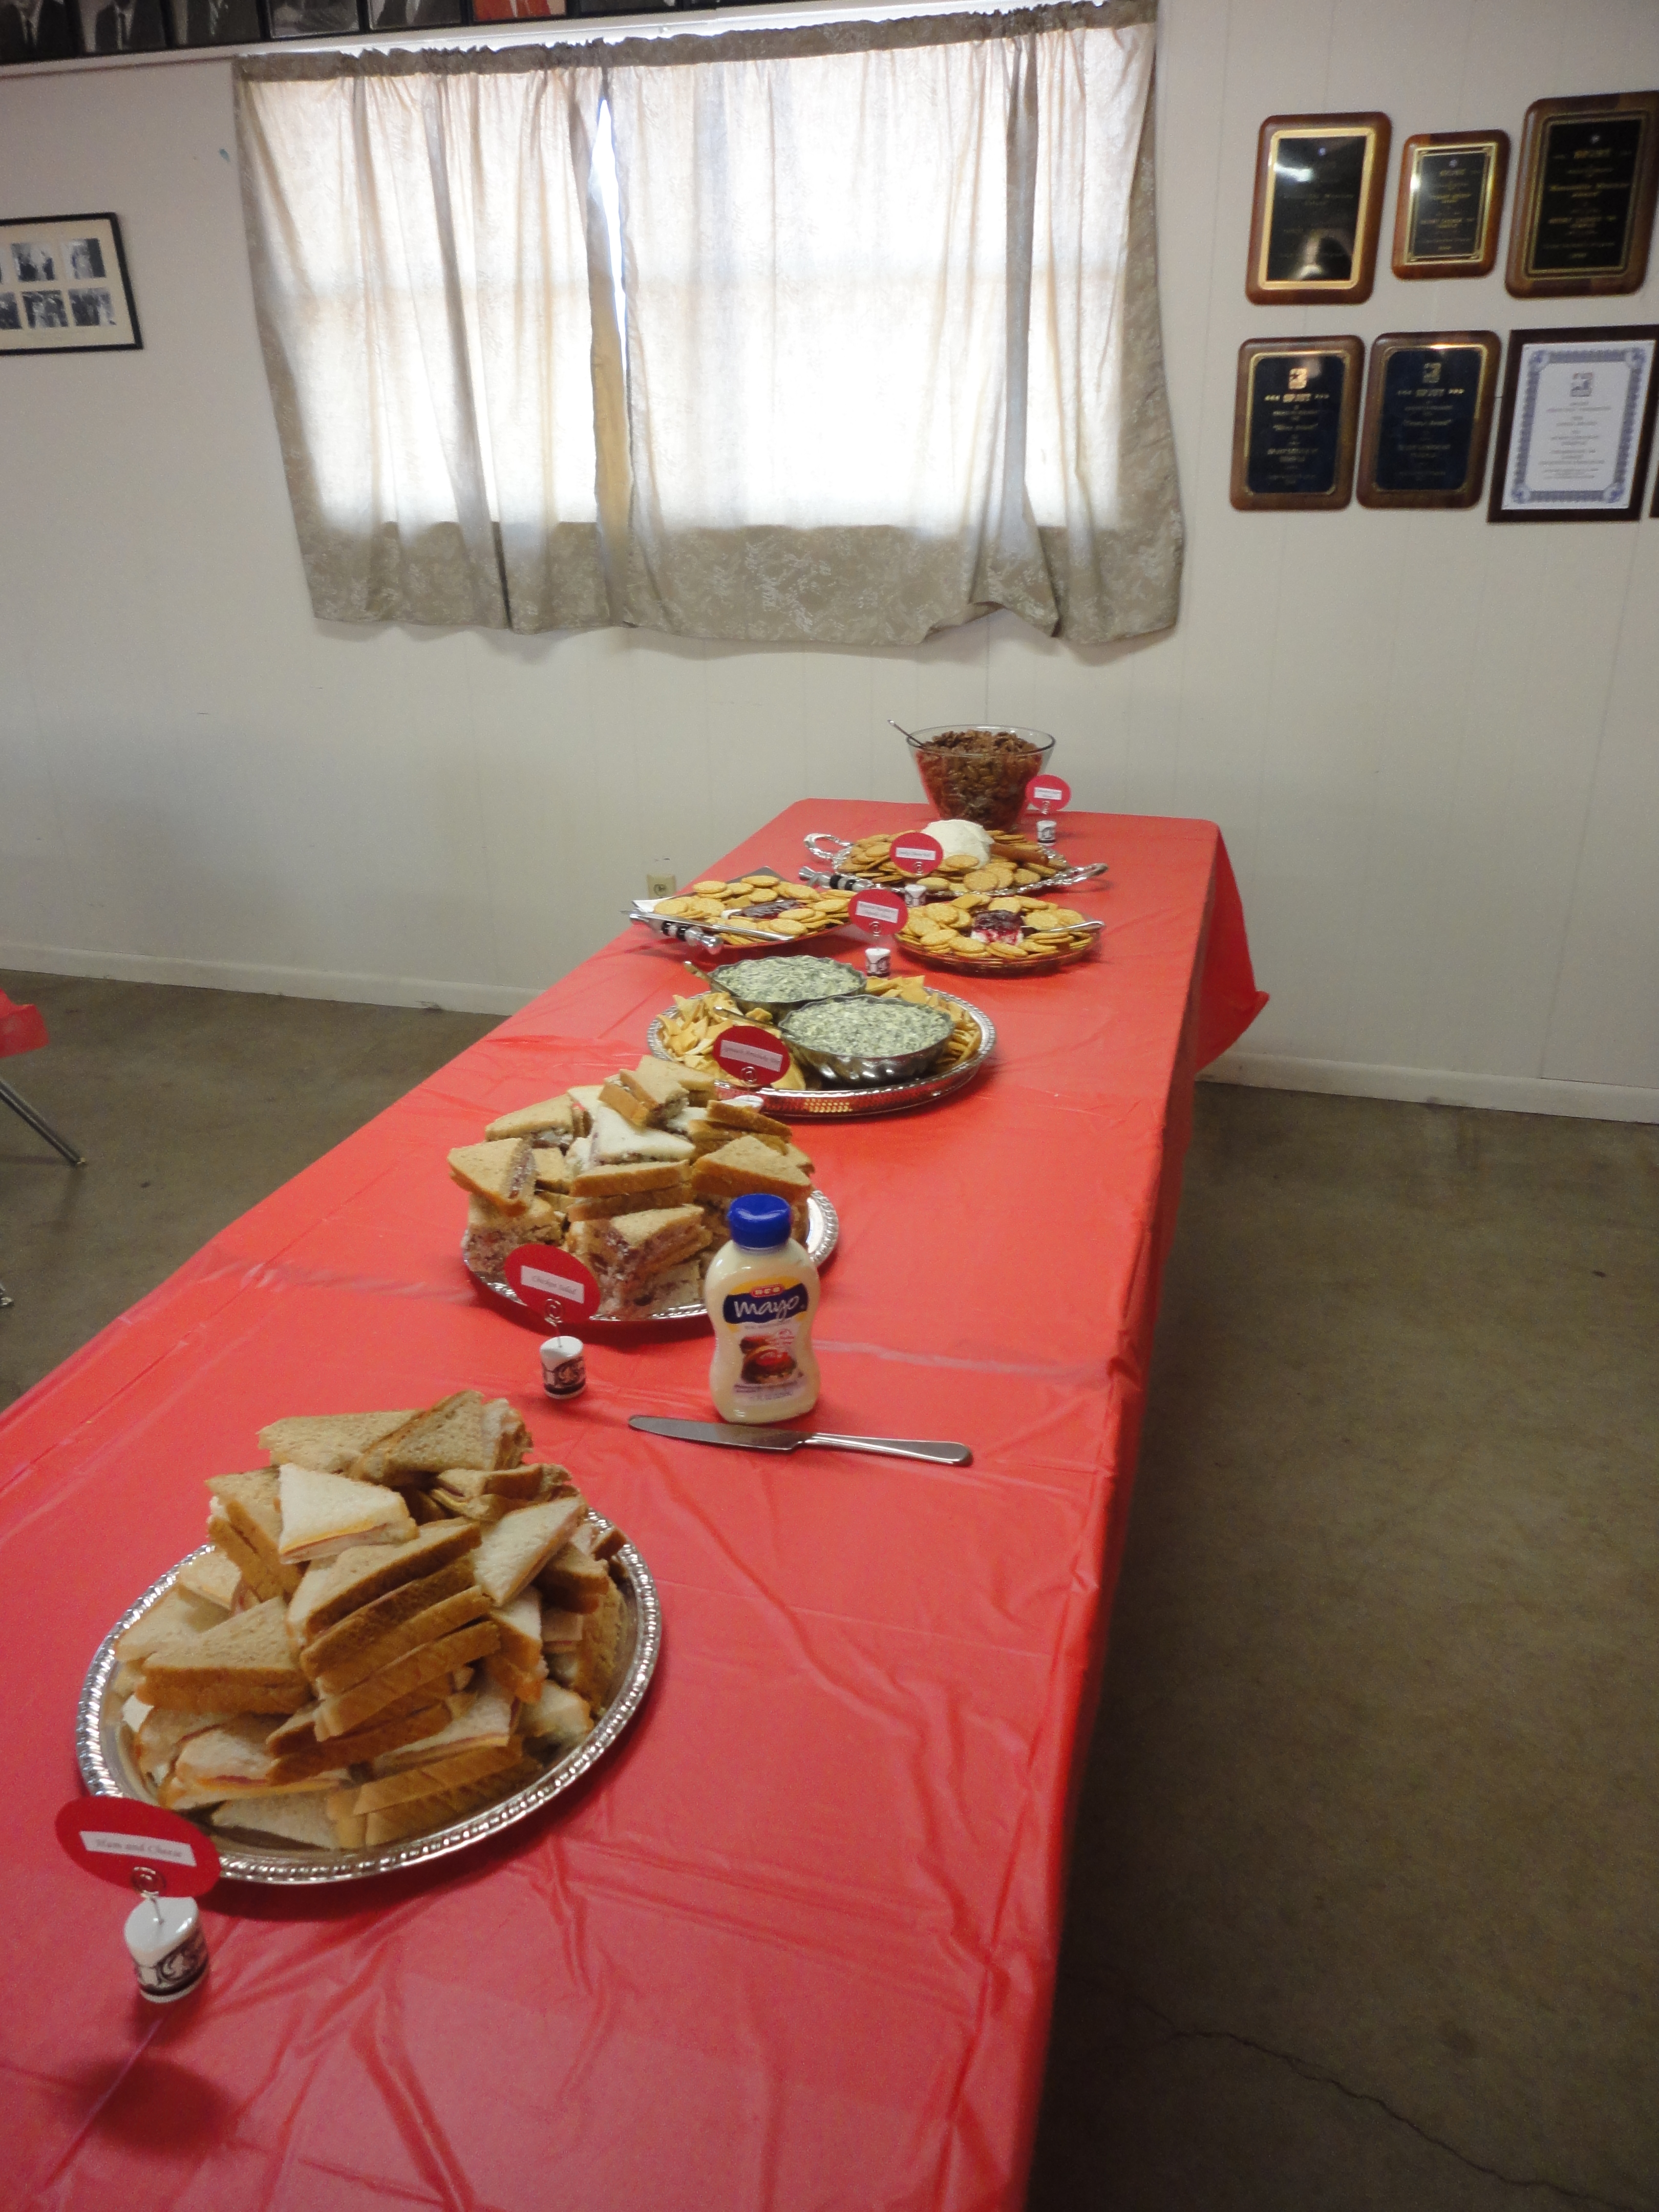
For food we had a ham & cheese sandwiches, chicken salad sandwiches, spinach artichoke dip, raspberry chipotle cream cheese with crackers, a cheese ball, and cinnamon sugar pecans.

DSC01698

DSC01717

They were so cute!

Overall it was an incredibly successful party and their anniversary was well celebrated. So thankful for all the family who came.

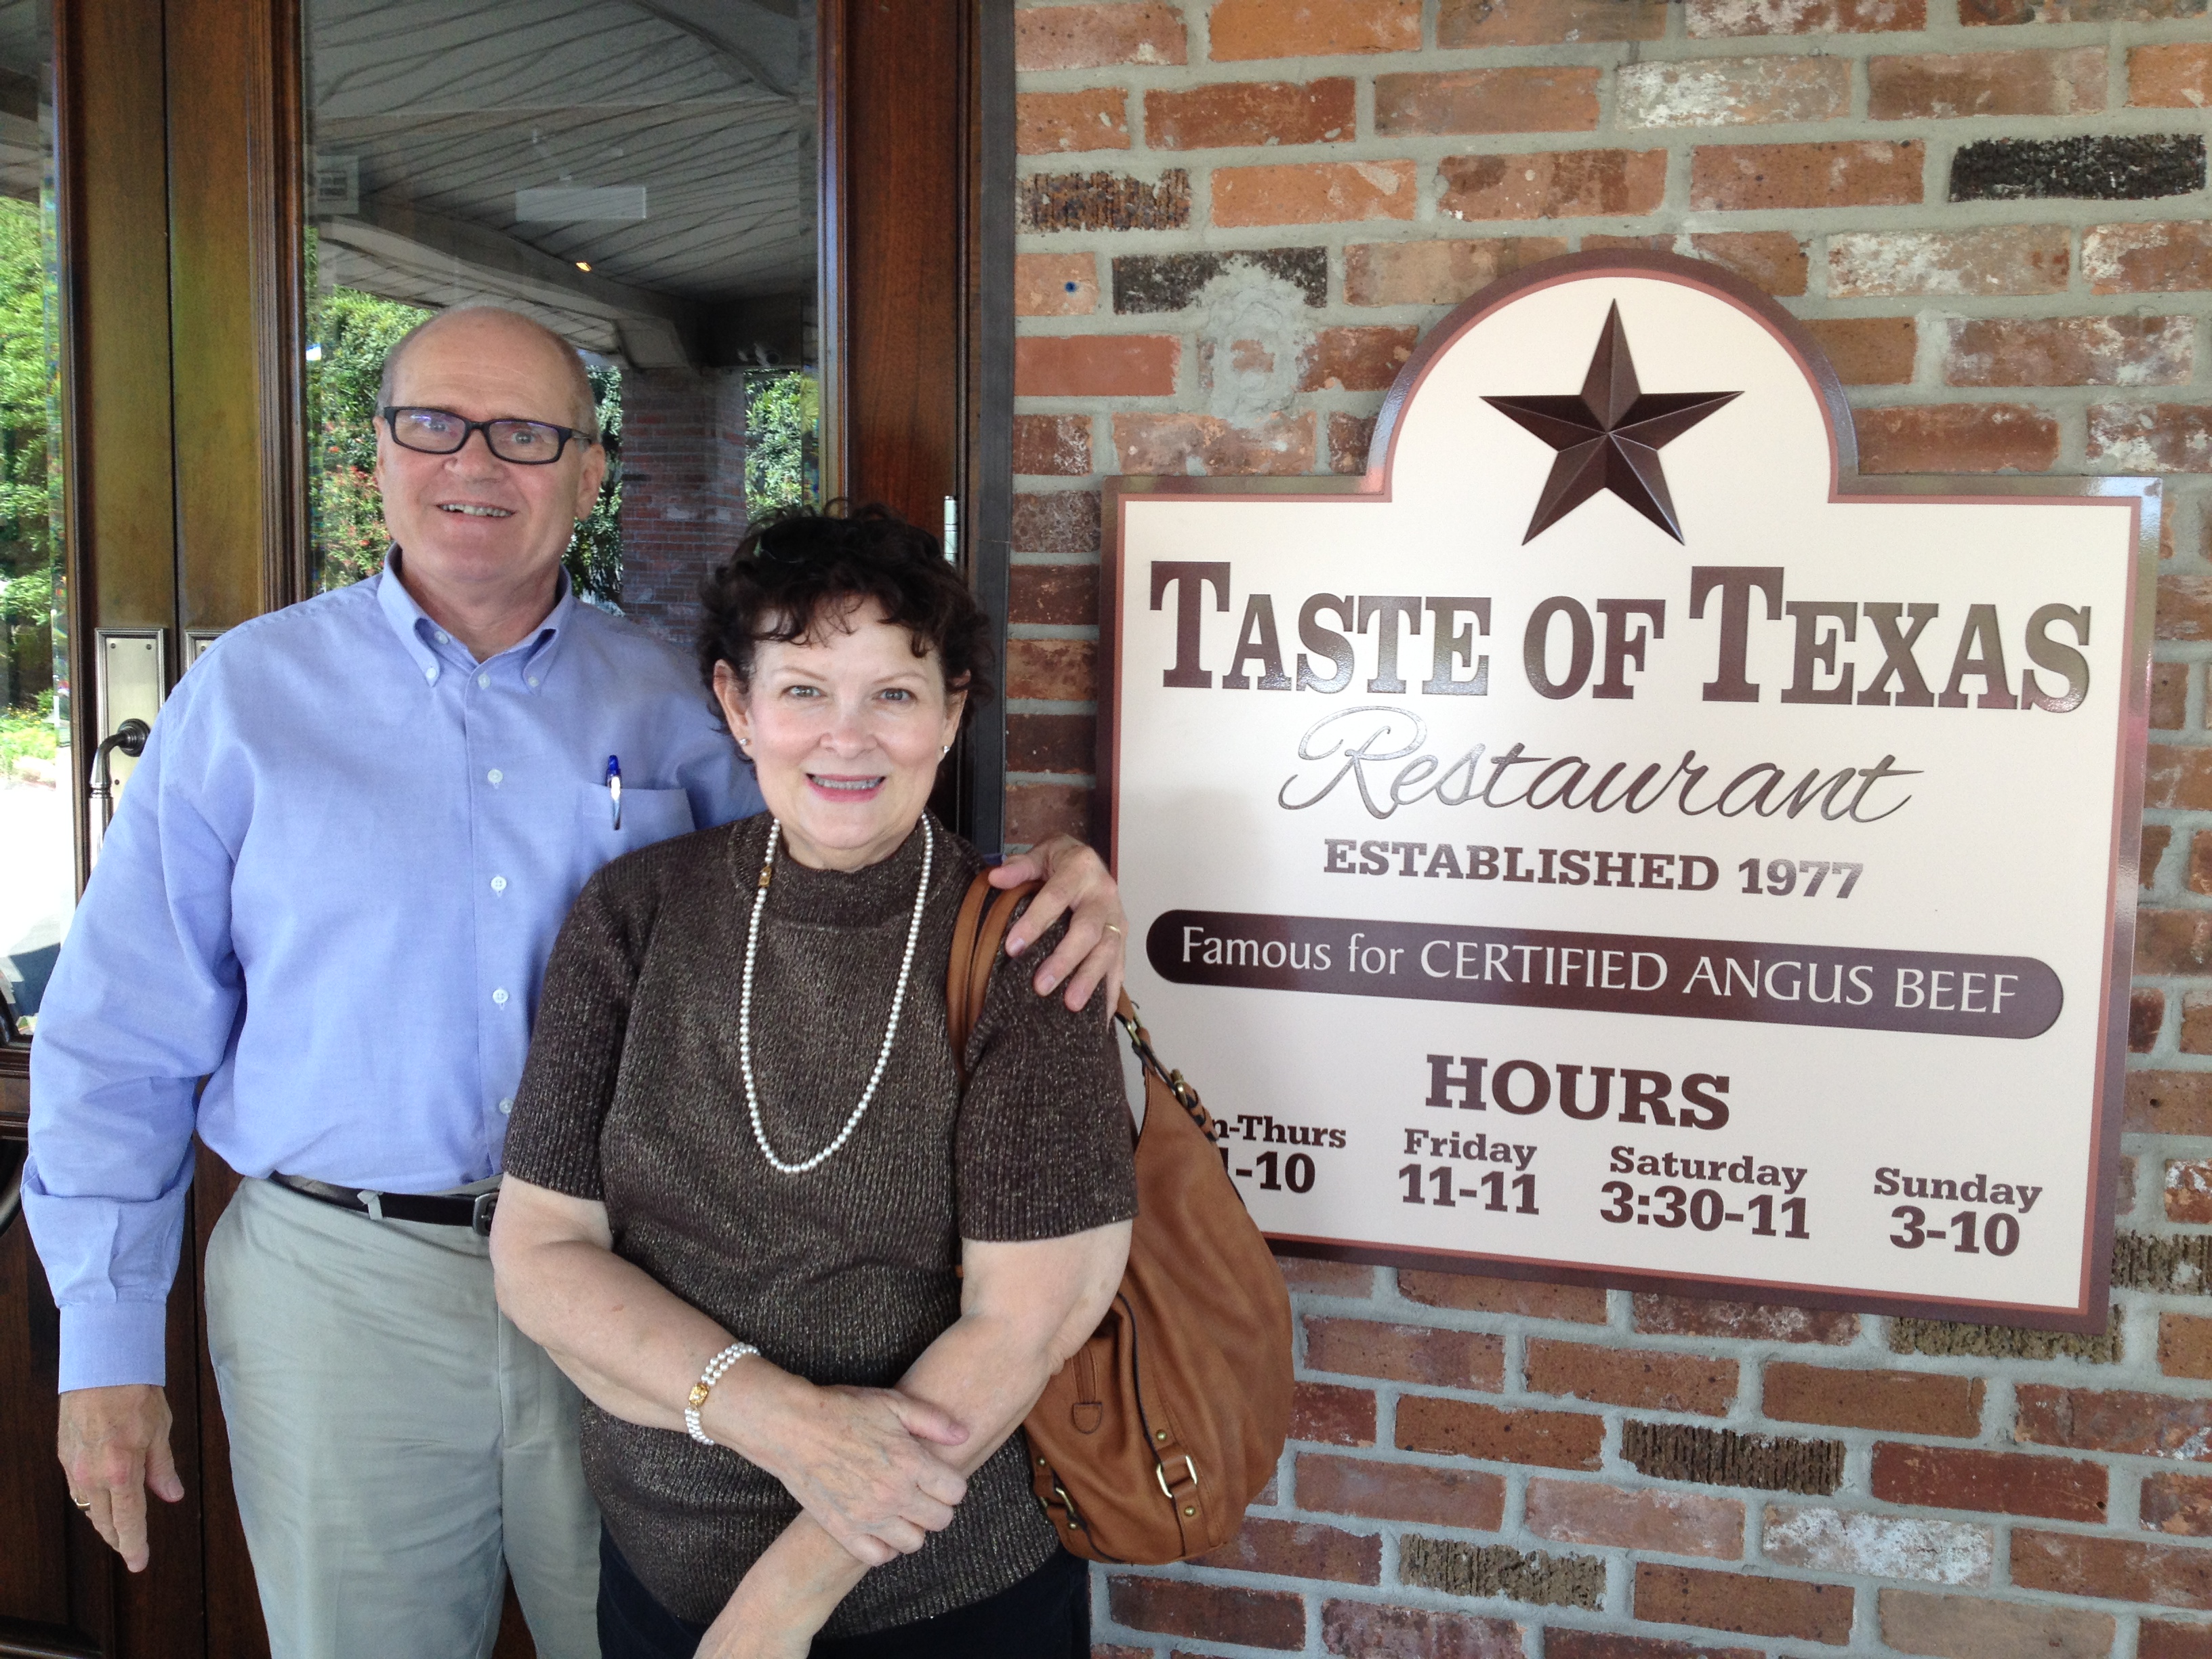
That brings us to celebrating my parents’ 40th a month ago. We talked with them about a party, but we live in a different city than them and family is spread across the state. Logistically it was just going to be tough. So, we opted to go visit them and take them out for a nice dinner at one of Houston’s best restaurants- Taste of Texas.

2014-05-03 (3) 40th anniversary dinner at taste of texas

For special occasions, they take your picture and present it to you at the end of dinner.

For special occasions, they take your picture and present it to you at the end of dinner.


And us, of course :)

And us, of course 🙂

Such sweet celebrations! We are so thankful for parents who have stuck together for so long, honoring the vows and commitment they made to God and each other. What great examples for us as we continue in our marriage.

Now time to start planning for the 50ths!


Leave a comment

Filed under Home, Hubby

Gallery Wall

Back on April 15th I posted about my DIY coffee table tray, and promised that next week would be a post about our newly revised gallery wall. Well, here we are about two months later and I’m finally making that post. I blame it on the lack of natural light in our home. I couldn’t figure out how to get a good picture. But I finally just took some pictures and hoped for the best. So, as usual, please forgive the bad pictures!

A few months after moving in to our house in 2012, we worked on painting and decorating the living room. We had an empty wall, one with no furniture or anything, so I wanted to do a gallery wall. Pinterest has sure set the bar high to make those perfect. After looking at many pins, I finally laid out the frames and had my husband hang them. I have a touch of OCD and things have to be symmetrical. Hence, our perfectly symmetrical and organized original gallery wall:

old for realSo that was all well and good. It was nice. But we kept running into those sconces and I got tired of the predictable look. I wanted something a little more “fun” with some elements other than pictures. So I went to Hobby Lobby and bought some new frames, found some other elements, and let go of my need for symmetry.

photo 4

photo 2

My favorite element is a printable created by my friend Jennifer, the owner of Prettiest Print Shop. At our wedding, we had a worship time with the song “How Great Thou Art”. I wanted that song displayed in our home and she created the perfect wall hanging with the lyrics. Though, now it gets stuck in my head every day!

photo 3

If only you couldn’t see my reflection….

I purchased a pattern from Etsy and cross stitched the “M” with gray chevron.

photo 2 (2)

I am so, so happy with how it all came together. I have to give credit to my hubby for hanging everything so perfectly! It really helped to brighten up our living room and add some life to it. Now I need to figure out how to have pictures that aren’t just of us!


2 Comments

Filed under Home

Backyard Makeover

A year ago we were deep in the midst of a backyard makeover. Our yard needed a lot of updating and fixing and the results were amazing! It took a couple months of a lot of hard work, but we are so proud. At the time we finished it last year, I didn’t have a blog. Once I started the blog I wanted to post, but decided to wait until the spring to make it more seasonally applicable. Most of what we did has stayed the same throughout this year, but we did have some plants die in the Texas heat last summer and plan to replace those in the next few weeks.

Here is what our yard and patio looked like upon moving in.

2013-02-16 (8) before painting houseYuck. There wasn’t room for the table and grill and people. We tried eating out there a few times, but it didn’t work!

2013-02-16 (9) before painting house

2013-02-16 (10) before painting house

Something had to be done! Once we moved in, we systematically (because that’s the only way I do things…) went through each room and re-did it. It was a year before we finally finished inside and moved to the outside! We were so excited to get started and totally change things back here.

We started by painting the exterior of the house. It was in MAJOR need of a new coat of paint, and a new color. We spent all of February working on that and went from this gross, gray blue to a fresh beige. Look at the difference paint made on our front door area!! Love it. Can’t get over it.

front doors

But, I sure hope I never have to paint a house exterior again. That was HARD work.

So after the paint, we had our patio extended and had a cover built over it. These were the only things that we paid someone else to do. It was just quicker, easier, and better that way.

Patio being extended

Patio being extended

Michael was home the day they poured the concrete and wrote our initials and the date!

Michael was home the day they poured the concrete and wrote our initials and the date, and put Oliver’s paw print in it.

The new patio provided so much more space! I don’t have any pictures of them putting the cover on. But we chose to not have it extend all the way- we left an open area on the end for the grill and fire pit.

In mid-April we began tearing down our old fence on two sides, and replacing it. So much cheaper to do it ourselves (well, for my hubby and neighbor to do it…).  This was a pretty extensive project.

2013-04-19 (2) new patio, now to start on the fenceThat random sheet of metal is one of the main reasons I wanted a new fence. What the heck were the previous owners thinking??

Beginning to tear the old fence down

Beginning to tear the old fence down

Found a snake in the fence!

Found a snake in the fence!

New fence going up!

New fence going up!

With all that done, at the beginning of May we started the landscaping. That involved creating flower beds, picking flowers/plants, and planting!

2013-04-27 starting the landscaping

Michael working on planting shrubs

It took a couple of months to get all the elements I wanted. We had pondered paying a landscape company to come in (and part of me regrets that we didn’t), but we chose to do it ourselves and I think it turned out pretty good! Once everything was done, it is a HUGE change from what we had before. We LOVE it.

2013-07-05 (3) backyard makeover complete!

2013-07-05 (2) backyard makeover complete!

2013-07-05 (4) backyard makeover complete!

2013-07-05 (10) backyard makeover complete!

This was inspired by a pin on Pinterest. The hubs built it and I painted it. I love the fun splash of color it adds!

This was inspired by a pin on Pinterest. The hubs built it and I painted it. I love the fun splash of color it adds!

Coasters I made from Shiner bottle caps

Coasters I made from Shiner bottle caps

My friend Janie made this sign for me. Go check out her Etsy shop- More than Frills.

My friend Janie made this sign for me. Go check out her Etsy shop- More than Frills.

2013-07-05 (8) backyard makeover complete!

2013-07-05 (7) backyard makeover complete!Love our stepping stones 🙂  (Though, it’s been a year and the tiles/stones are coming out of them… sad day)

So, thanks for coming on this (a year late) tour of our backyard!! We LOVE it and it shows that it’s possible to do a really great backyard makeover on a little budget!


1 Comment

Filed under Home

DIY Tray

Recently I made two somewhat small changes in our living room, but that I think made a big difference in how the room feels. One was that I re-did our gallery wall. I’ll be blogging about that next week because it’s not quite done. Today I wanted to write about a tray I made for the coffee table and how I re-organized the table.

I was pretty neutral about our table and living room space, until I ran across this pin on Pinterest:

fccc3bd1af51261f4c556cc7fad6b790I LOVE everything about this living area. So cozy, comforting, and welcoming. I don’t think ours will ever look like this, simply because of color scheme differences and because I HATE  the un-functionality and cluttered look of throw pillows. But, I used it as a template for changing the look of my coffee table.

I decided to do a DIY tray. I went to Hobby Lobby without a firm idea and came out with supplies to stain some planks and make a hardwood floor looking tray bottom.

IMG_5600I bought an unfinished tray, several packages of small planks, stain, paint, and a varnish. I am in love with this paint color and this stain and have used them on some other projects.

IMG_5603Americana Sea Glass acrylic paint and Americana Walnut gel stain. A-mazing.

I sanded and painted the tray, then it was time to do the planks. I placed them in the tray to see how they would fit and I ended up having to cut some down to size. Then I stained them.

Some of the planks before staining

Some of the planks before staining

I did two coats of stain to make them darker.

After one coat, waiting to dry so the second coat can be applied.

Drying after one coat, waiting to dry so the second coat can be applied.

Once the planks were stained and dried I put a coat of varnish on them and then glued them onto the tray using wood glue. The next day I varnished the entire tray and called it done! I am so happy with how it turned out.

2014-03-31 (18) coffee table redo

2014-03-31 (7) coffee table redo

So, since I had a new tray, I needed to add other new things to my coffee table! This is how our coffee table has looked for two years:

2014-03-31 (1) coffee table redo

Definitely not bad, but not exciting. Years ago I bought that spinning remote holder and painted it. It has served us well, but it has a college-y feel. It’s time for it to go. It was also time for the tractor magazines to not be front and center.

I chose four things to put on the tray:

  • The teal candle shown above. I was given it a couple years ago and I love it so much! I’ve only burned it a few times because I can’t bear to see it go away.
  • Coasters
  • The remote control
  • I purchased a mason jar and a burlap flower to put it in

The table felt very empty with just the tray, so I searched on Etsy and found a fabulous runner that coordinates so well with my gallery wall (you’ll see it next week!). I purchased it from The Littlest Bean Boutique. She was wonderful and custom made a length for me.

2014-03-31 (15) coffee table redo

2014-03-31 (17) coffee table redoI love the feel it gives the room and it makes me smile so much. Just so different than what we had before. Much cleaner and not as clutter-y. (And no worries. all those tractor magazines are still there, just not on the top of the table anymore).

Tray


2 Comments

Filed under Home

Bathroom Closet Redo

In our master bathroom we have a large linen closet. I’m very grateful for it because it holds a lot, things that we wouldn’t have any other place for. (Though, sometimes I wish we had a shower stall instead of the closet, but I guess a closet is better…. I think). The only problem with this massive closet is that the original shelves were very deep. Things got lost in the back. There was a lot of shelf space, but because of the design it felt like there wasn’t.

(*Disclaimer* It’s VERY difficult to get good pics of this closet.  The lighting is always bad and there’s not a lot of room to get a good angle. So… excuse the bad pics!)

Before...

Before…

So much randomness lost in the deep shelves

So much randomness lost in the deep shelves

My husband was actually the one who first thought about taking out the existing shelves and building some new ones. It’s times like this that I’m very thankful that he knows how to do carpentry stuff and can get cheap lumber from his job at a lumber yard!

The first step was to take everything out of the closet and find other places for it! That was the hardest part (for me at least!). Then we measured and decided on the width and design of the new shelves. He built the shelves and painted them (I helped on that part!). He took out the existing shelves and braces, then painted the closet. Then finally it was time to install the new shelves! (I’m sure there was a lot more to the process, but I tried to stay out of it. Apparently nagging isn’t very helpful….)

Working hard!

Working hard!

I am SO happy with how they turned out. It’s really the same amount of shelf space, but the different design makes it so much easier to organize things better.

2014-03-06 (1) bathroom closet done

Then came the fun part- organizing everything! We already had some baskets so I continued to use those for medicines, then I used our Christmas card boxes for other storage (yes, we had saved them hoping they would come in handy for something like this!). I love how it came together. Everything is much more accessible. And we have extra space!DSC02370


Leave a comment

Filed under Home

Duggar Family Laundry Soap

laundry

I’ve never really been into DIY cleaners, etc. It just seemed a bit unnecessary to me. But now that we’re all more aware of the chemicals in our cleaners, and the cost!, I thought I would give DIY laundry soap a try. I LOVE the Duggars and so I wanted to go with their recipe. I found the recipe and did a lot of other research to make sure it worked well and such. Everything I found was really positive, so I decided to try it!

They make a liquid version that ends up being 10 GALLONS of soap. I was excited because that would last us for well over a year. There are only three ingredients and the process seemed easy enough. I had seen on some blogs people complaining about how hard it was to make, but it took me less than 30 minutes, and that included clean up. After combining everything in your 5 gallon bucket, you’re supposed to wait overnight and let it gel.

Stirring the liquid after combining all the ingredients. Feeling hopeful!

Stirring the liquid after combining all the ingredients. Feeling hopeful!

Mine never gelled. I checked it every day for almost two weeks and every time the soap was separated from the water. I looked online to see if anyone else had had this issue. They did and recommended adding more Borax. I did. I stirred it really well. Still wouldn’t set.

It's not gelling.

It’s not gelling.

I’m really baffled. I have no idea what went wrong. The process is so simple, there really isn’t anything to mess up. I thought about trying again but didn’t want to waste more ingredients, so I just decided to make the powdered version. This one doesn’t make as much (I’ve read about 40 loads), so it isn’t as cost effective. But it’s still cheaper than store-bought (I’m assuming. It takes way too much math to figure that out and I haven’t attempted to do it yet).

photo 1

Duggar Powdered Laundry Detergent (for top loading machines only)

  • 1 Fels-Naptha soap bar (You can also use Ivory which is a whole lot easier to find!)
  • 1 cup Arm & Hammer Super Washing Soda
  • 1/2 cup Borax
  1. The goal is to get the soap into powder form. The recipe suggests grating it or putting it in a food processor. I wasn’t successful at this so mine was kinda chunky. I think it’s working anyway.
  2. Once the soap is powder-y mix the three ingredients together.
  3. Use 1 Tbsp. for a light load and 2 Tbsp. for heavy load. Yields about 3 cups of soap (approx. 40 loads).

We’ve used this three times so far and it seems to be cleaning well. It doesn’t have the “fresh” scent that store-bought does and I kind of miss that. But I think it’s worth it.

My cost breakdown:

  • Borax: $3.38
  • Arm & Hammer: $3.24
  • Ivory soap (3 bars): $1.24

So $7.86 total and can make multiple batches before having to buy more ingredients. Definitely a money-saver!

Update- April 17: My first batch lasted for 25 loads (which was about five weeks for us). I think part of why it wasn’t 40 like the recipe said is because my husband’s work clothes tend to get pretty dirty so I use more. I made another batch today and am going to keep track again of how many loads it does. Want to make sure this is saving us money!

Leave a comment

Filed under Home

Healthy(ish) Banana Muffins

A few months ago when we were at my parent’s house, my mom had made some banana muffins. They were delicious. We couldn’t stop eating them! She sent me home with the recipe and I made them for the first time a couple weeks ago. Being on Weight Watchers, I had to calculate the points and they were 3.8 pts each. Too many points, especially since I couldn’t eat just one! So I adjusted the recipe a bit this week and made them again, and they are now 2.5 points each. I took out some of the sugar and oil, and made them a little smaller. But still perfectly delicious. This recipe makes 24 muffins.

(Please excuse my bad photo... We were eating them so quickly I almost missed the opportunity to take one!)

(Please excuse my bad photo… We were eating them so quickly I almost missed the opportunity to take one!)

These could also be made healthier by using different oil, different flour, adding proteins… But I’m just not into all that, yet.

Banana Muffins

  • 1/3 cup brown sugar
  • 1/2 cup white sugar
  • 1/4 oil
  • 4 oz. unsweetened applesauce (the amount in one of the little containers)
  • 2 eggs
  • 1 tsp. vanilla
  • 2 cups flour
  • 1 tsp. baking soda
  • 2 mashed bananas
  1. Preheat oven to 350 degrees. Place baking cups in pan or spray muffin pan.
  2. Beat oil and sugars well.
  3. Add applesauce, eggs, and vanilla.
  4. Add flour and baking soda. Mix well.
  5. Stir in bananas.
  6. Fill muffin tins 1/2 full. Bake about 15 minutes, until brown on top and toothpick comes out clean.


2 Comments

Filed under Home